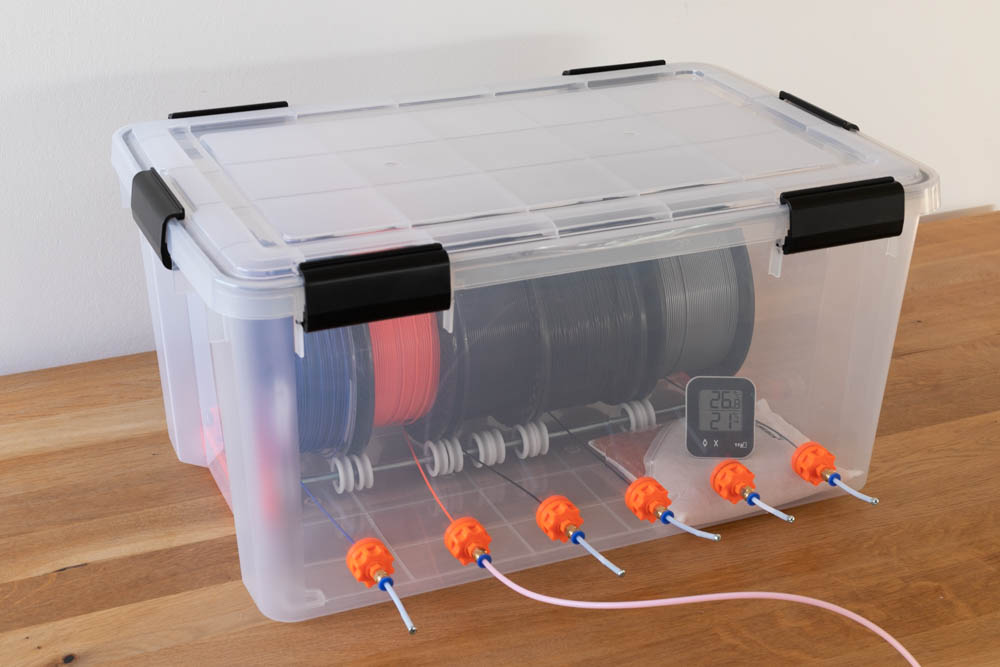
For perfect prints it is important to keep your filament dry and dust free. Best to store it in an air sealed box. Even better if it is possible to print your filament direct out of the box. In this post I show you how to build your own filament box which could hold up to 6 filament spools.
This post contains affiliate links, which are marked with an asterix (*).
Hold on! With the Filament Box Version 2023, there is a complete new version of the filament box available at my new website, click the buttons below for the advantages, instructions and 3D print files.
Built your DIY filament box
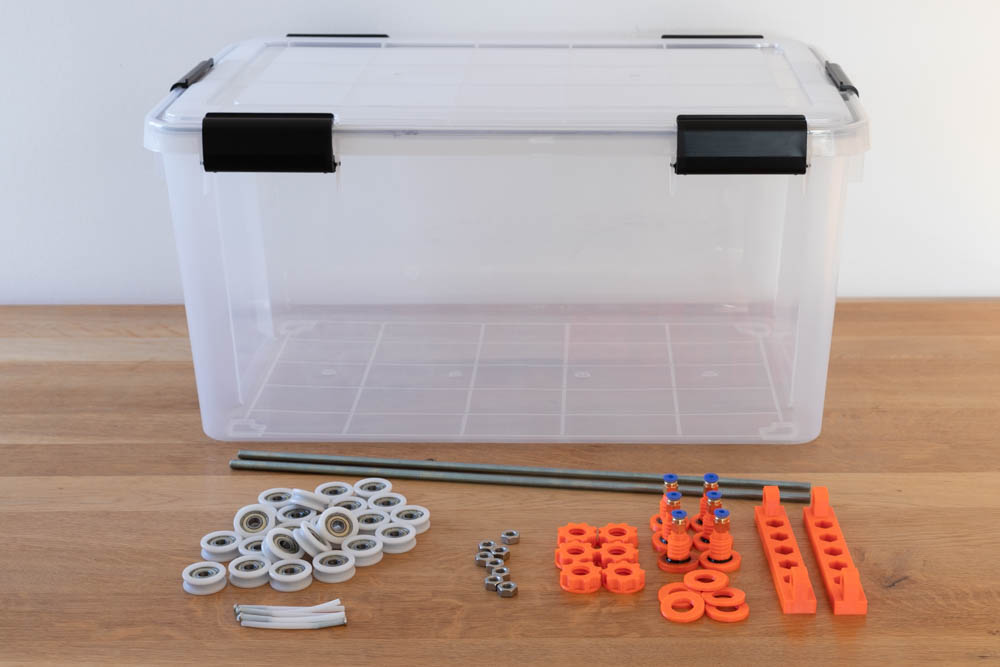
I decided to go with an already air-tight box to reduce the mess with the silicone sealant. All needed components, links to them, and a cost approximation are in the following bill of materials. Of course all the screws, nuts and threaded rods you can also grab at the hardware store. But of course, first of all: the safety instructions.
Safety Guidelines
Safety first! Read and follow the assembly instructions and the operation manual!
Read the entire instructions and operation manual carefully and adhere to the instructions and safety guidelines. If anything is unclear, simply contact support (info@anybot3d.com). In the 3D print files for this project, the instructions and operation manual are also attached as PDF, keep it because you may need it later. Otherwise you will always find the latest version of the instructions and the operation manual here. If you are giving the project to someone else, then print out the instructions, operation manual and, above all, the safety guidelines and pass them on with the project.
Before you start the project, also check whether the project meets the safety regulations of your respective country.
Warnings and symbols


Safety instructions for this 3D printing project
Never lock living beings (children, animals) in the box! Danger of suffocation, danger to life! Only for storing commercially available filament!
Keep the filament box safe and out of the reach of children and animals, the filament dry box is not a toy!
Do not leave the 3D printer unattended while printing! If the printing is interrupted or the 3D printer makes unusual noises, switch off the 3D printer immediately, check the filament box and the filament feed!
Also read through, follow and keep the operation manuals and safety instructions for the purchased parts!
Attention for all purchased parts: Before assembling, check whether they meet the safety regulations in your country and whether the dimensions, function and stability are fine. Repeat this safety check at regular intervals and before using the project. If a part is damaged or unsuitable, do not continue to use the project until the affected part has been replaced.
Attention for all self-printed parts: Due to incorrectly set printing parameters, poor material, incorrect material selection, poor layer adhesion and other reasons, these can sometimes not meet the requirements needed on them and thus break, fail or their functionality cannot be guaranteed. In the event of a break, the parts can splinter and the fracture surface leave sharp edges. Take particular care when replacing these parts, there is a risk of cuts! Check 3D printed parts for cracks, stability and functionality at regular intervals and before using the project. If a part is damaged or unsuitable, do not continue to use the project until the broken part has been replaced with a new, improved part.
Always place the filament dry box horizontally and at a stable, safe location.
When printing parts, sharp edges can occur (usually on the first layer), there is a risk of cuts! These edges have to be ground down in order to deburr them.
Bill of materials for the filament box
For the 3D print files (*.stl) click here to subscribe to the newsletter and get the free 3D print files.
- 1 pc air-tight box* (approx. 25 EUR)
- 8 pcs M8 nut* (approx. 0,5 EUR / 10 pcs)
- 6 pcs pneumatic fitting with a M6 thread for a 4 mm tube* (approx. 2 EUR / 10 pcs)
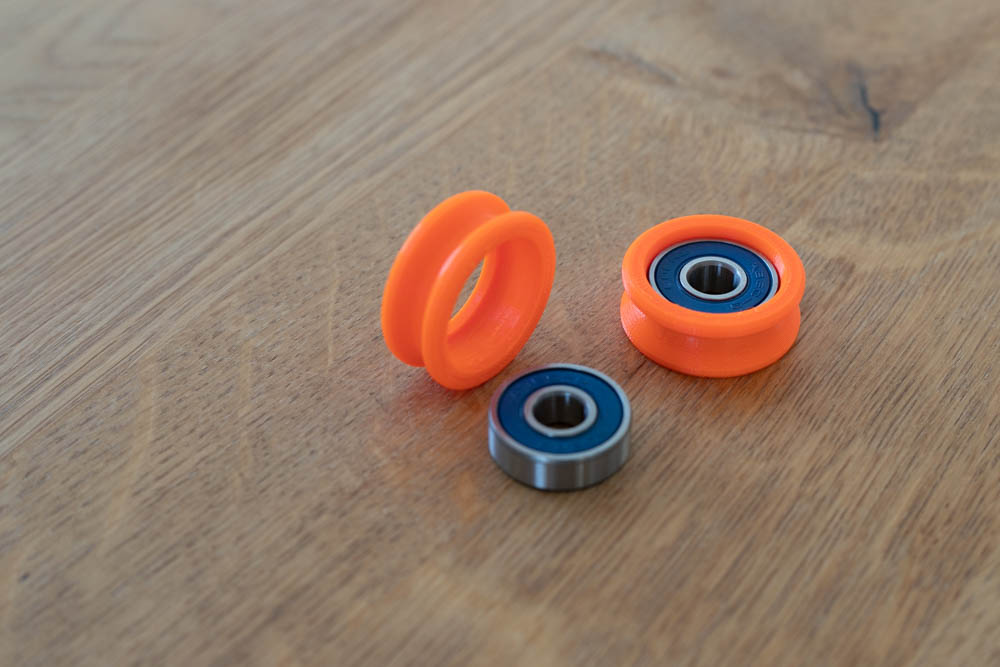
- 24 pcs guide roller including 608U bearing* (approx. 15 EUR / 25 pcs)
- 1 m M8 threaded rod* (approx. 7 EUR)
- 1 m PTFE tube OD: 4 mm ID: 2 mm* (approx. 1 EUR)
- 1 pc silica gel* (approx. 6 EUR)
- 6 pcs M3 screws* (approx. 1,5 EUR / 10 pcs)
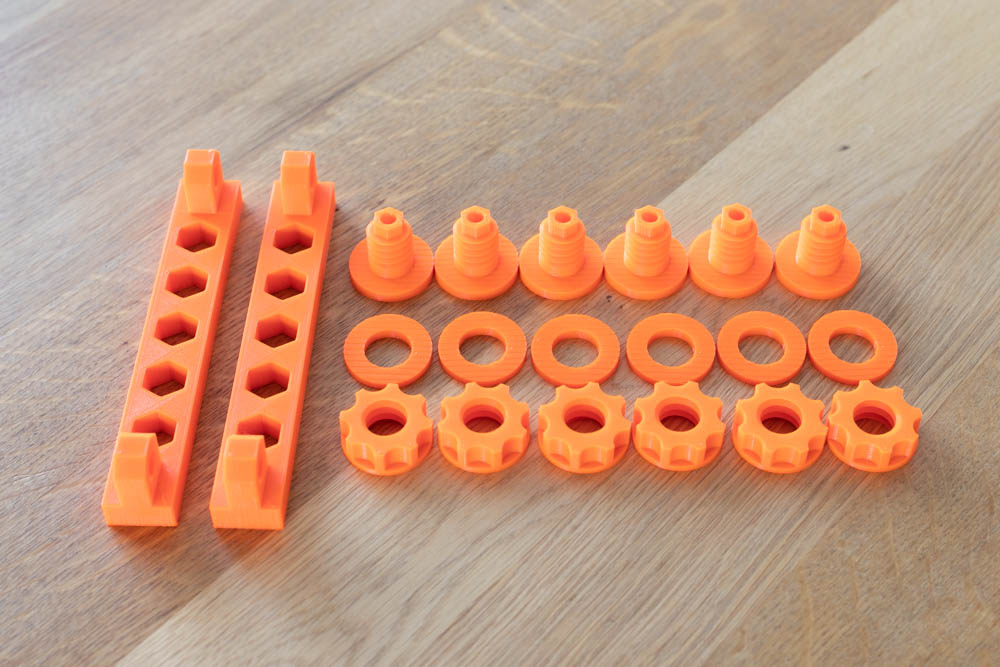
- 2 pcs 3D printed rod mounts
- 6 pcs 3D printed fitting mounts
- 6 pcs 3D printed washers
- 6 pcs 3D printed nuts
- 6 pcs 3D printed flexible sealings
- 14 pcs 3D printed spacers
- or: silicone sealant* (approx. 7 EUR)
- optional: hygrometer* (approx. 12 EUR)
Without the printed parts and the hygrometer the costs are around 63 EUR. The box is capable to hold up to 6 filament spools, depending on their dimensions.
Instead of buying the assembled guide rollers you could also print the guide rollers yourself (included in the 3D print files) and buy standard 608U ball bearings* (approx. 10 EUR / 16 pcs).
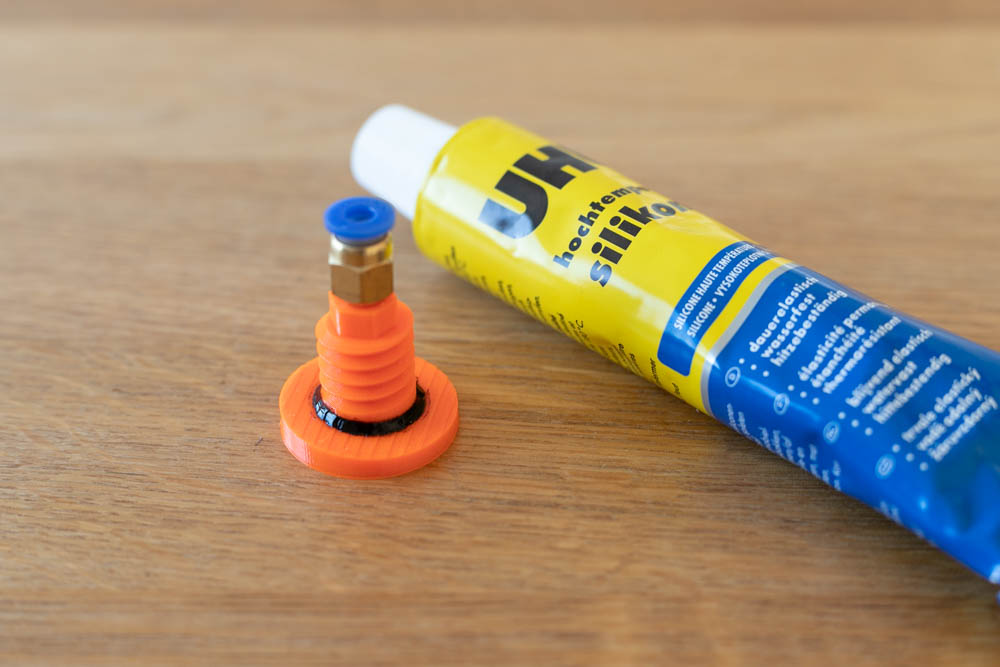
To seal the fitting mounts in the box it’s possible to use the printed flexible sealings or use silicon sealant.
All links marked with an asterix (*) are affiliate links, meaning, at no additional cost to you, I will earn a commission if you click through and make a purchase.
Printing settings
All parts were printed on my Prusa i3 MK3* with Prusament PETG Prusa Orange* using a standard 0.4 mm nozzle. The rod mounts were printed with 0.2 mm layer height and 50% rectangular infill. The fitting mounts, nut, and washer were printed with 0.15 mm layer height and 50% rectangular infill. With the standard settings you going to need about 13h printing time. All parts together needs approx 130 g filament, which is about 4 EUR material costs.
Revision: The 3D printed nut is described by many users as too tight fitted, here you may need to scale the nut in the slicer a few percent larger right from the start so that the thread runs smoothly.
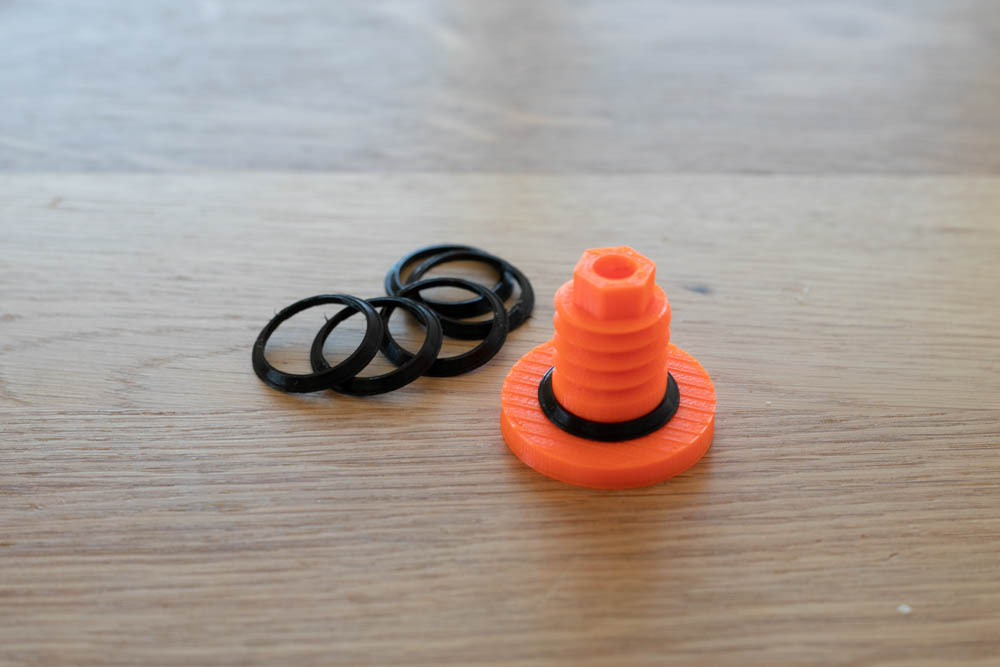
If you going to use the printed flexible sealings instead of the silicone sealant, I made mine with Fiberlogy Fiberflex 30D* with a layer height of 0.2 mm. They are really tiny and only need a couple of minutes.
Beside the flexible sealings also the 14 spacers are missing on the following picture of all 3D printed parts.
For the printed roller guides I used Prusament PETG Prusa Orange too with a layer height of 0.2 mm and 50% rectangular infill. Afterwards just press the ball bearing in the printed part, quite easy if you use a secound bearing to push it in.
The ball bearings must sit securely and firmly, as well as parallel and not crooked in the roller guides! Important so that the filament spools do not block later!
Required Tools
- Cordless screwdriver*
- Wrench set*
- Wood drill bit 2 mm* and Wood drill bit 4 mm* (wood drill bits cut best through the plastic of the box)
- Step drill bit* (including 16 mm step)
- Hacksaw* (for cutting the threaded rod)
- Metal file* (for deburring the thread cuts)
- Marker Pen*
Assembly instructions for the DIY filament dry box
So you got all the parts, then start with cutting the threaded rod in two pieces, each 470 mm long.
Wear protective goggles and gloves when sawing, securely clamp threaded rods before cutting.
Attention, sharp metal grade – deburr the threaded rods with a file after cutting.
If you got another plastic storage box, then measure the inner length on the bottom of the box and subtract about 15 mm to get the needed rod length.
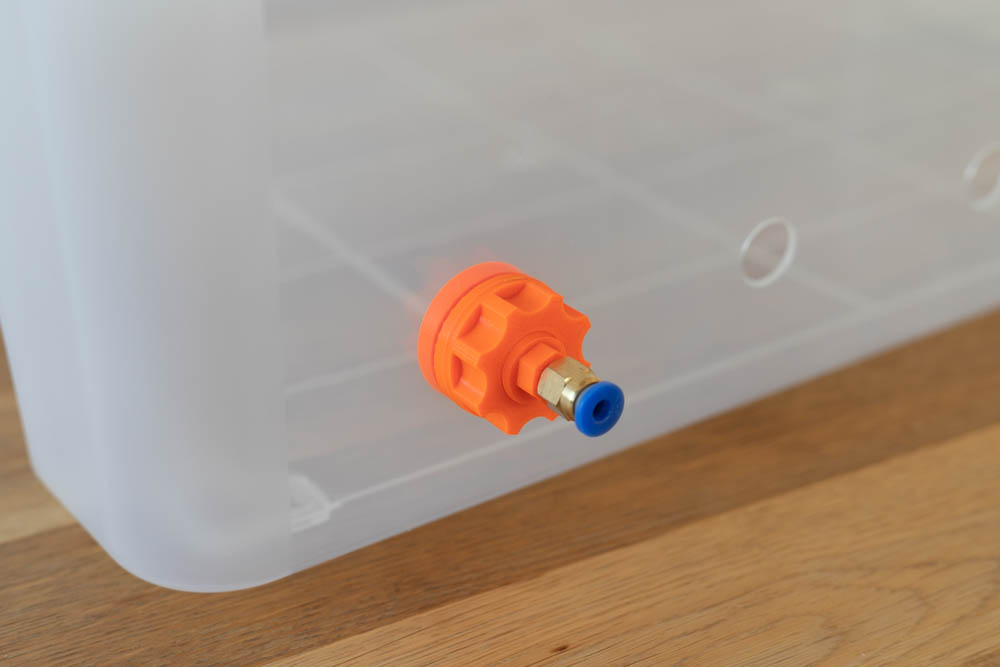
If you use the silicon sealant on the fitting mounts, apply about 2 mm sealant on the inner edge of the flange. Screw in the pneumatic fittings with the M6 thread in the printed fitting mounts.
As a test, pull the filament (1.75 mm) through the hole of the fittings mount and the screwed-in pneumatic fittings and check for clogging and ease of movement. If necessary, remove residues or burrs, or drill out the assembly until everything runs smoothly.
With the printed flex sealing it’s far more easier, just put them over the fitting mounts. You find the 3D model of the flex sealing in the ZIP-file, see the bill of materials section.
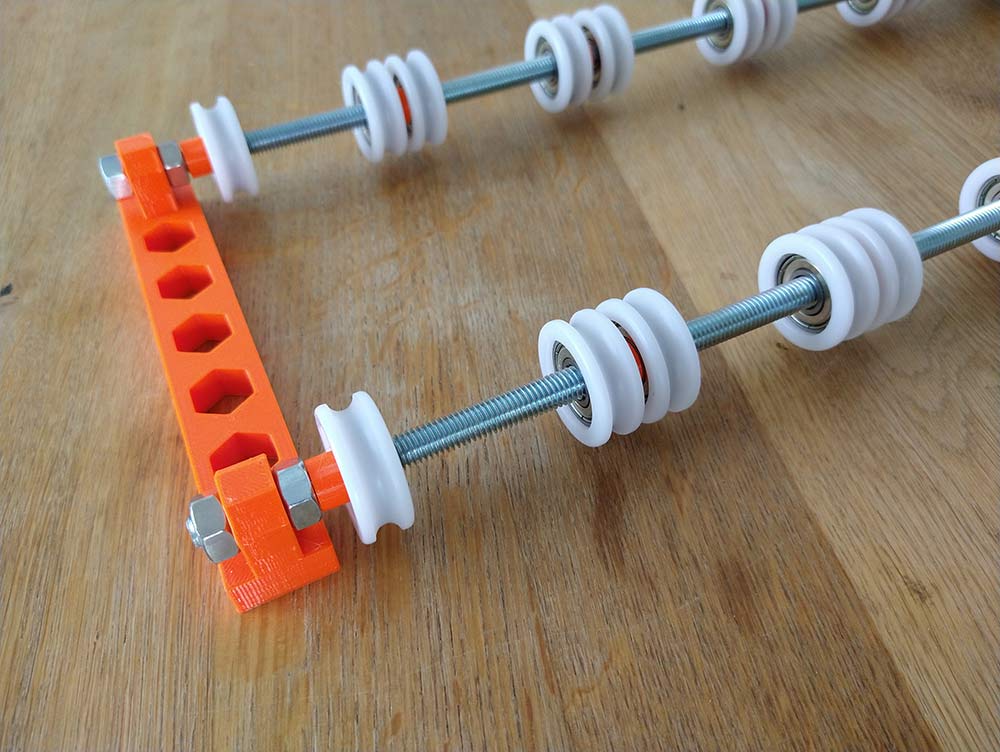
Place the threaded rods in one printed rod mount and secure them with two M8 nuts each. Slide 12 roller guides and 7 spacer on each rod and fix the other printed rod mount with two M8 nuts each.
The spacers are used wherever two roller guides collide and thus hinder each other when turning, as well as to maintain the distance to the nuts on the rod mount, see pictures.
The distance between the roller guides could be later adapted to fit the stored filament spools.
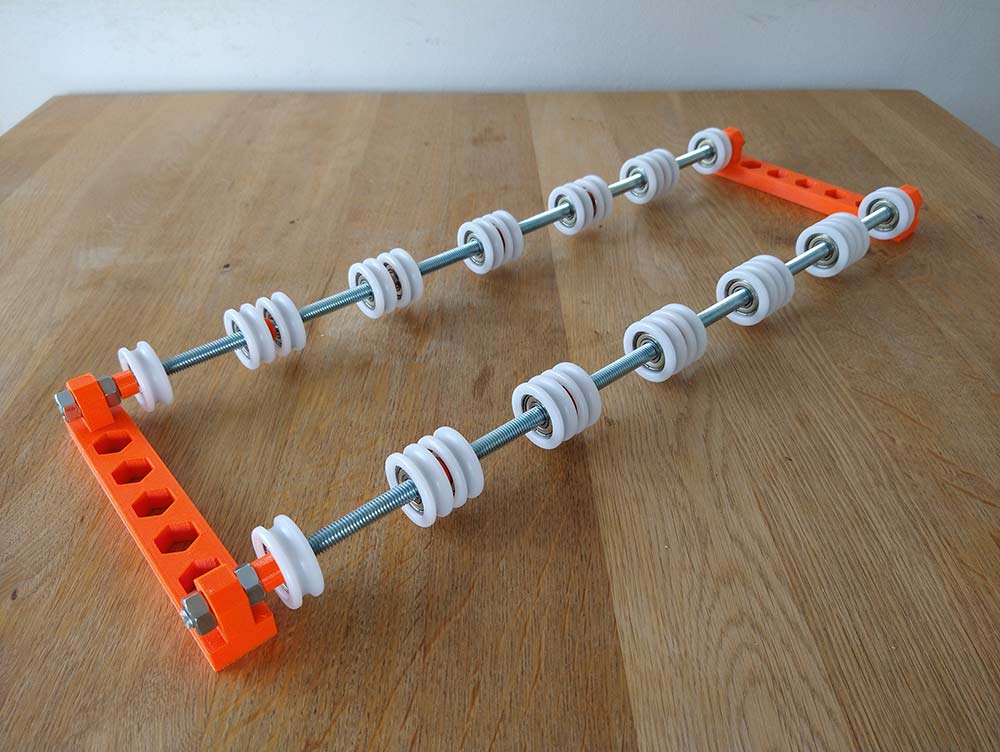
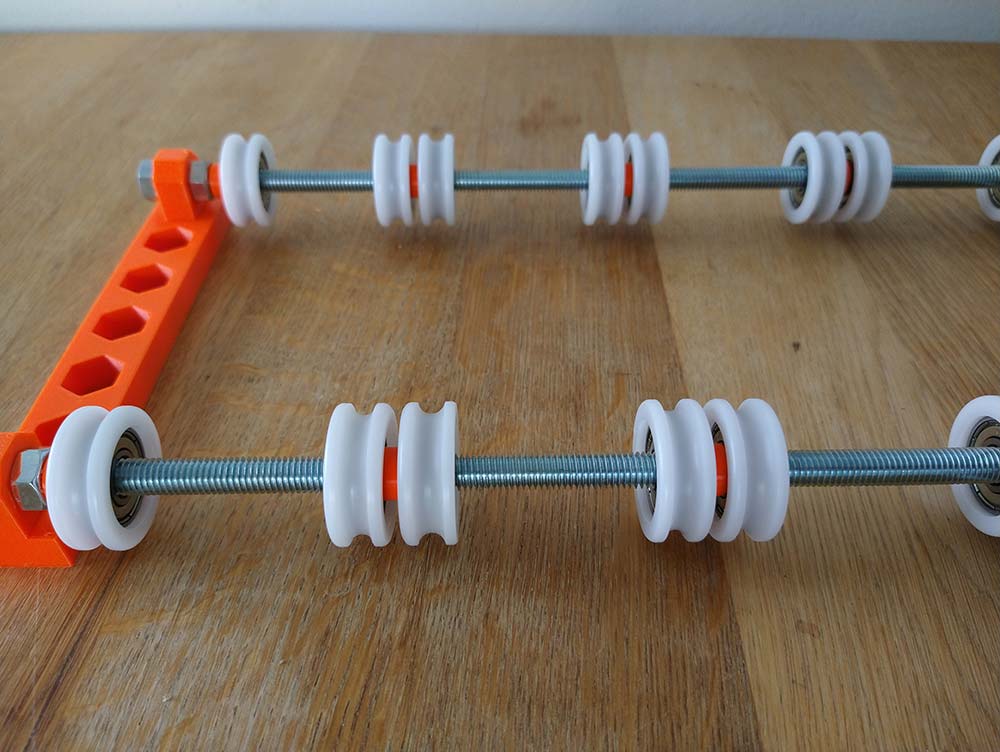
The spacers prevent that later, when two filament rolls are close to each other, a stationary filament roll is not driven by a running filament roll.
Check that all roller guides lying next to one another and the distance to the nuts on the rod mounts are separated by a spacer and that the rollers do not hit anywhere else.
Check at regular intervals and before operating the filament box that the ball-bearing rollers are not grazing anywhere and thereby blocking an inserted filament roll.
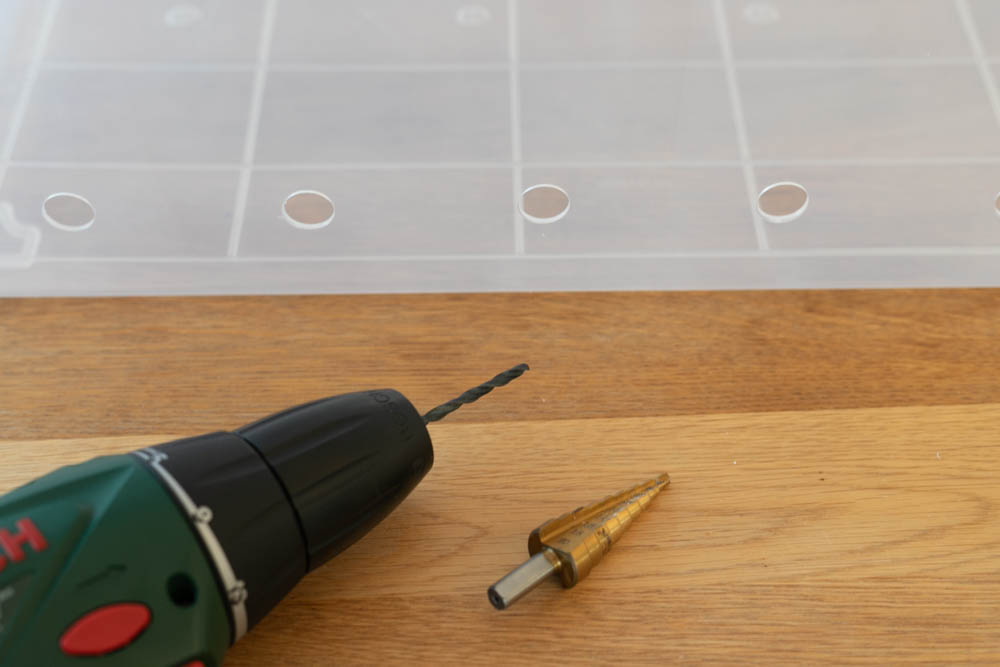
Now it’s time to drill the air-tight box, put be careful don’t push to hard – I was impatient and destroyed a box. First mark the locations, see following sketch for the positions I used for the box.

For the filament passage you going to need 16 mm holes. First I pre-drilled the holes with a 2 mm wood drill bit*, then open them up with a 4 mm wood drill bit*. Finally use a step drill bit* to open them up to the 16 mm. To make life a little easier, Flo created a drilling template to mark the correct distances, here to download on thingiverse.
Wear protective goggles to protect against chips.
Sharp wood drills are very suitable for the plastic of the box, it is important to exert little pressure on the box – it could break if too much pressure is applied. Therefore it is best to pre-drill as described first.
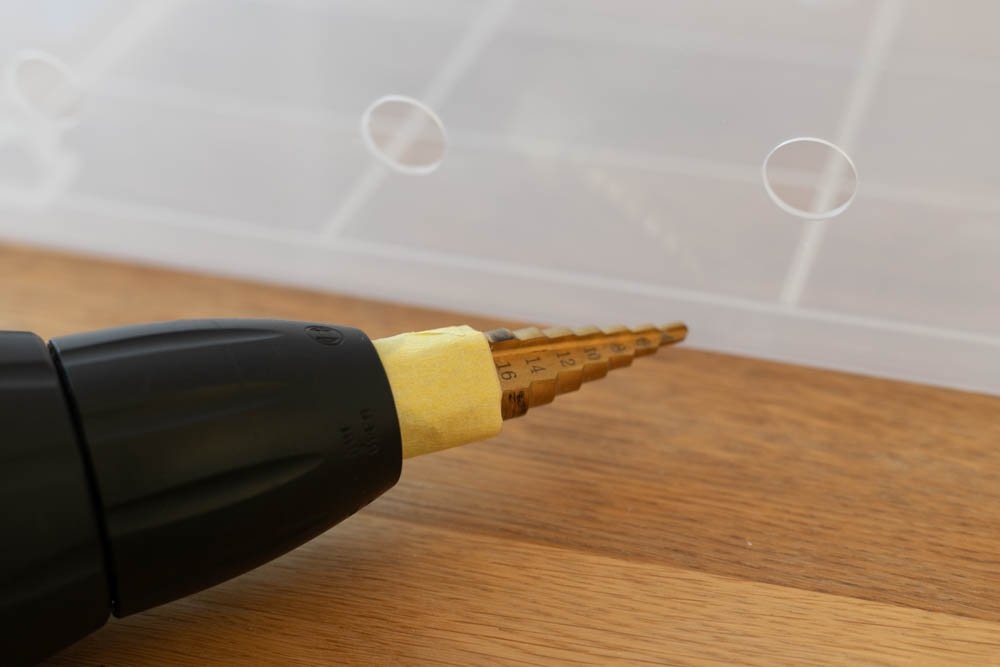
Expert tip: Mask the larger diameters on the step drill to avoid too large holes.
Fit in the prepared fitting mounts, keep an eye of the slant flange, this is meant to equalize the draft angle of the box. The thickest part of the flange should be oriented on top.

Then the washer is fitted on the printed fitting mount. Be cautious, the washer is also slant – the thinnest part should be on the top and the slant surface orientated to the box.
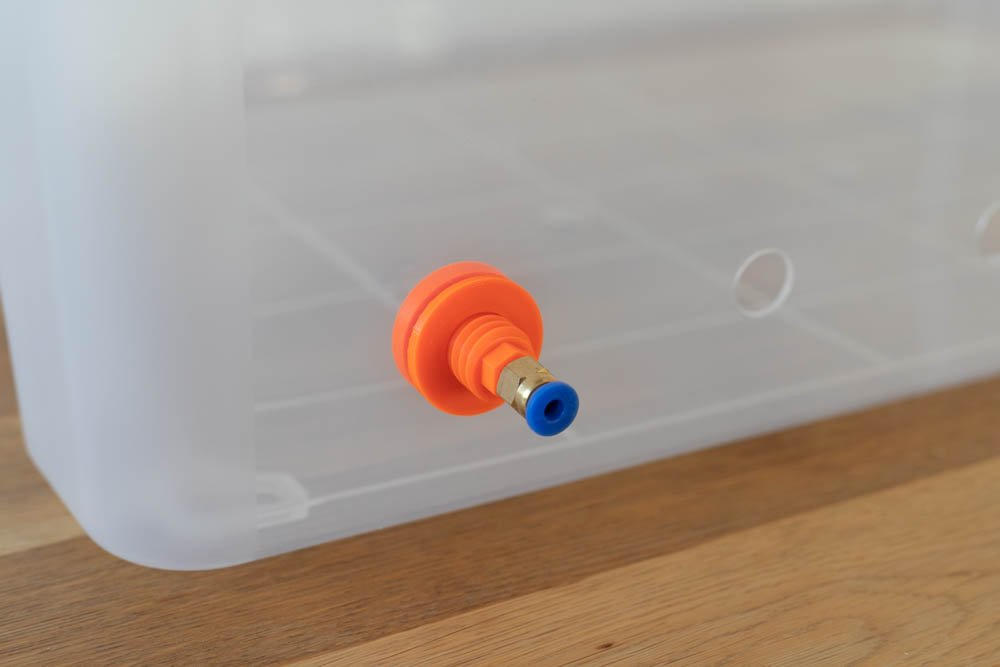
Secure the fitting and the washer with the nut, pay attention that the fitting mount and the washer did’t turn when you fasten the nut.
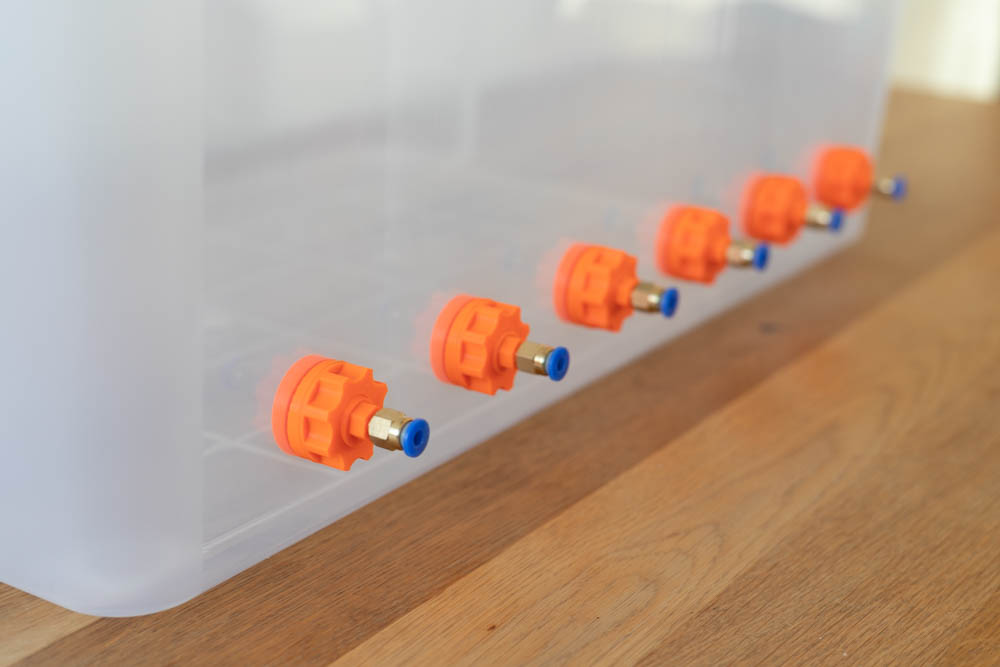
The same on all six fittings, to get the box ready for final assembly.
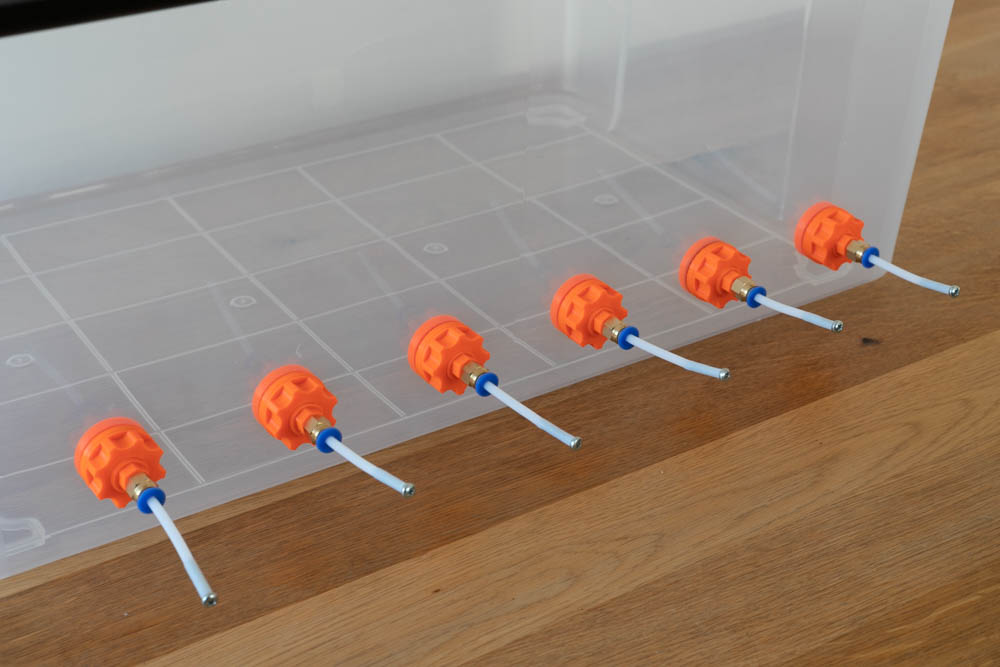
To close the pneumatic fittings with filament you don’t use you cut short PTFE tube pieces (approx. 10 cm) and screw in a M3 screw in one side.
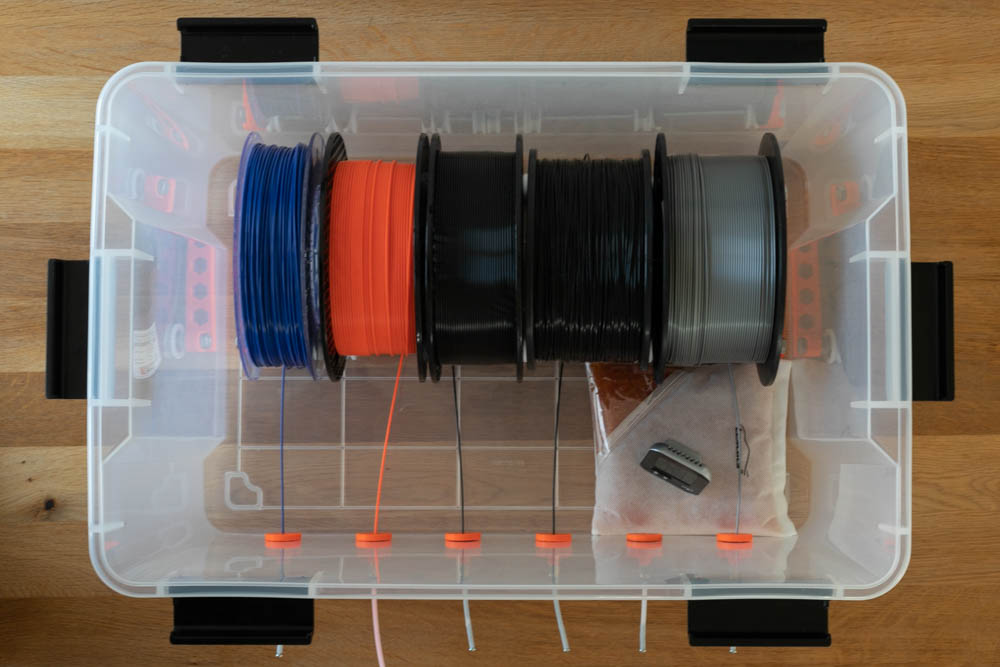
Now it’s time for the last steps: To put the spool holder, silica gel and hygrometer in the box.
It is best to fix the filament spool storage in the filament dry box with double-sided adhesive tape, as shown here in the instructions for the new Filament Box – ANYBOX V2.
Leave enough distance to the walls of the filament box and after fixing it, test whether the largest roll of filament to be stored can also rotate freely. Otherwise change position and test again.
Adjust the roller guides to hold your filament spools and place them. Insert the filament end in the short closed PTFE tubes. The insertion and threading of the filament is described in more detail in the operation manual at the end of these instructions.
When inserting the filament spools, check that they can rotate freely and that they do not touch the floor or the walls of the filament box – if a filament spool touches or blocks, this filament spool is not suitable for the filament storage box.
Test whether the filament can be easily pulled through the outlet assembly of fitting mount, screwed-in pneumatic fittings and PTFE tube.
If the filament blocks or can only be pushed through under a lot of pressure, the outlet assembly must be checked for blockages or too small bore diameters and cleaned or replaced.
The last thing missing is the silica gel to keep the contents of the filament box dry. As shown here in the pictures, it is not ideal because the silica gel bag used can block or brush against the roller guides or filament. This can then lead to the filament being difficult to pull out or even blocking completely. Either store the silica gel bag in such a way that it does not come into contact with the filament spools or the filament or use smaller bags. Another option is to use loose silica gel granules in the 3D printed silica gel box, which is available as a free add-on here.
During operation, the silica gel must not obstruct or block the filament spool or the filament that is pulled off!
Last thing to do is to close the cover to seal the box. If you need a specific filament for a print just pull out the closed PTFE tube and get the filament without opening the cover. Put on a longer open PTFE tube – I use a 20 cm tube – on the filament you want to use. This guides your filament and the small gap between tube and filament prevent moisture to get in the box. So you can leave the filament in your printer if you don’t use it.
Boom an there it is! Ready to take on the eternal war against moisture! Here some pictures of my setting with the Prusa i3 MK3.
Before starting up, read the operation manual at the very end of the instructions.
Revision: Like Barry Mason in the comments mentioned – don’t place the hygrometer on top of the desiccant like I did on the picture, this will give false low reading. Put the hygrometer as far away from the desiccant to get an accurate reading of the environment.


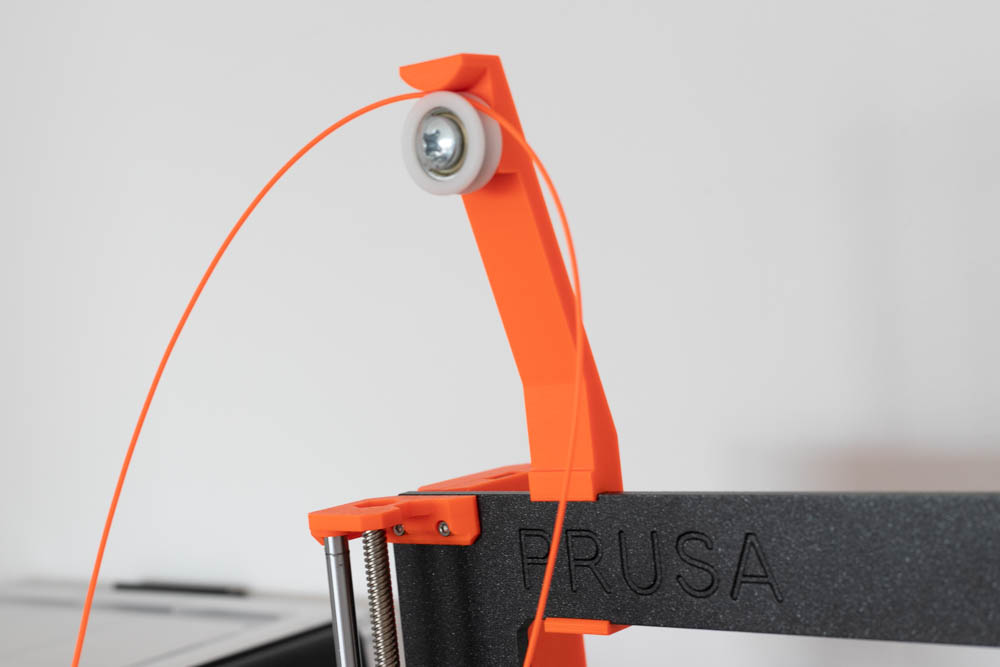
To build the fancy filament guiding on the Prusa, just get a roller guide, a M8x20 screw, a M8 nut and the prusa filament guiding model in the zip file, see the bill of materials section. Happy Printing!
Check the filament guiding and the used deflection roller guide at regular intervals and before operation for ease of movement of the roller, stability and stable attachment.
Operation manual
Inserting the filament spools:
Move the guide rollers on the threaded rods so that the filament spool to be inserted is safe and centrally on the four guide rollers after it has been inserted.
Align the filament spool so that the filament end is at the bottom of the filament spool and points towards the filament passage, see also the following illustration of the filament dry box.

If the filament spool sits securely and stabe on the guide rollers, then pull off the filament end from the bottom of the filament spool, as parallel as possible to the bottom of the box and thread it straight into the opening of the fitting. Push the filament through the PTFE tube until it until it comes to the M3 screw.
Check new filament spools which you insert that they can rotate freely and do not touch the walls or the floor of the box – if the spool brushes or blocks, this filament roll is not suitable.
If filament blocks or can only be pulled through the passage under a lot of pressure, inspect the filament guidance and all the components involved must be checked for clogging or too small bore diameters. Correct orientation and clean or replace the blocking components before operation.
Check the ease of movement of the roller guides, the condition of bearings and rollers and their rotatability at regular intervals (every month).
Safety Check before usage
Perform this safety check on the filament box before 3D printing
- Check whether the filament spool is stable on all four roller guides.
- Check whether filament has become tangled on the filament spool – if necessary untangle and rewind.
- Check whether the selected filament roll can rotate freely and is not in contact with other filament spools.
- Check that the filament spool holder is parallel to the wall of the storage box and that the filament spools do not touch the walls of the box.
- Check the filament passages and PTFE tubes for blockages and whether the filament can be easily pulled through and check that the filament runs smoothly.
- Check whether the silica gel bag or the silica gel holder is blocking or touching the filament or the filament spool.
Maintenance of the silica gel:
Check the color of the silica gel at regular intervals (1-2 weeks) – if the saturation of the silica gel is reached very quickly (less than 4 weeks), the box may be leaking.
When saturation is reached (discoloration of the indicator dye) regenerate the silica gel bag according to its instructions.
Normally the selected silica gel bags (for 100ml water absorption) last about 3 to 6 months until it is saturated and has then to be regenerated.
Do not leave silica gel granules or bags open in the room for too long – always store them in the closed filament storage box or a closed plastic bag! Also keep the opening of the filament box to change a filament spool as short as possible, so the desiccant lasts longer without having to be regenerated.
Disclaimer:
The instructions and the associated files are ANYBOT’s inspiration to build this project yourself. Since ANYBOT has no way of checking and influencing the required quality of the printed components and purchased parts as well as the quality of the assembly and the correct functioning of the project or if any inadmissible changes and modifications to the project has been made, ANYBOT accepts no liability for functionality, stability or the damage incurred by the project.
Nice design, the only thing I could say to potential makers of this is DO NOT put your hygrometer on top of your desiccant pack like pictured in these instructions.
This will give a false low reading, ideally you want the desiccant to be as far away from the hygrometer as possible to get an accurate reading of the environment inside the box.
Hi Barry,
thanks fot the hint, you’re absolute right – think I’m going to mention it in the article.
cheers Marian
I love the design. In printing out the parts I’m discovering the Fitting mount for the filament is too small for the filament I use. I use 2.85mm reels of filament and they just won’t fit. I’m quite new to 3D printing and would appreciate any thoughts or tips you have. Should I just drill out the fittings I’ve printed? Should I alter them in tinkercad and reprint them?
Hi Terry,
thank you very much. I’m sry I forgot to mention that it is for 1.75 mm filament, so also the pneumatic fittings won’t go with 2.85 and the PFTE tube is also for 1.75 mm only, so simply drilling out the fittings won’t do the job. I’m already thinking about a V2 where I want to get rid of the pneumatic fittings and some other parts for easier filament change so why not a Version for 2.85 mm filament. But this is going to need some time.
Thanks for the reply! I’m finally looking to complete this project. I adapted the fittings design to allow for my 2.85mm filament and reprinted (I can share with you if you like). I also found that I needed to reduce the overall size of the Fitting mount to 94% of it’s original size as I found the printed nuts did not fit. I was able to find some PFTE tubing with ID 3mm and OD 4mm making your original recommended fittings work.
That’s great! Jeah the fit of the nut is really tight, nice rescaling trick to modify it. Thanks for your offer to share, but a complete rework of the design is still on my todo list, then I’m going to add a 3 mm filament design. Best wishes!
Love the design, but how do you rewind the spool after usage?
Becouse if you want to rewind the spool in this design you’ll have to open up the box and moisturized air will saturate the Sillicagel bag.
This will resultate in a spaghetti of 6 colors fillament.
Greatings from the Netherlands.
Hi Joris! Thanks, yes that’s a good question ;), sometimes I cut the filament near the box but it hurts everytime to waste these about 70 cm, more often I open the box and rewind it – the silica gel could handle a lot of box openings, but is of course saturated earlier. I’m right now working on a new version improving a lot of things and also going to test a new filament handling with 3 mm (inner diameter) PFTE tubes to come very close to the printer (up to the deflection roller) with only little friction and then go down to 2 mm inner diameter for sealing. So you only have to cut about 20 cm filament when you change it. Hope it is going to work fine and I’m able to upload and make the tutorial soon.
Best greetings from Vienna!
where is the files on how to build this
Hi Travis, I think you got the same thing as another user which was using a special Adblocker (Adblock Plus) in Chrome which prevents to show any content of the side. Try to open it in another browser or turn of the adblocker. Hope this works, let me know.
best wishes Marian
One idea for not wasting filament is to add extruder wheels with an extruder knob on each fitting, might be expensive but then you can just wind and unwind the spools as you wish without opening the lid.
Hi Christoffer,
thanks for the idea – you mean to simply push the filament back into the box? Problem is that it could get a little bit messy if the rest filament is long. Best would be if we could turn the filament spool from outside, but is quite difficult in this setting with that much spools beside each other. Or did I get your idea wrong?
Thanks! best regards Marian
Aha right I forgot about that part, yeah then I guess the spools would need to be taught, i.e. spring loaded so they “spool back up” unless as you say, have a handle on the outside, which in turn would need to be able to just turn one spool at a time. That would also be doable gearbox style, a shaft with notches that engages each spool individually depending on how far in/out the shaft is.
But yeah, these ideas are not trivial to implement reliably 🙂
Can you please send me a link to get the stl files for this nifty idea?
Hi James,
I know, the link is welle hidden – the files are available here https://anybot3d.com/en/download-filament-box-english/ so they are not completely free – all I want is your email adress 🙂 Happy printing! best regards Marian
Greetings! Very useful advice within this post!
It is the little changes that produce the greatest changes.
Many thanks for sharing!
Awesome article.